

Before you start reading this post, I just want to let you know that this is going to be a long one, so get comfortable and grab your favourite beverage while you read this amazing post on how to teach about the human body in a fun and interesting way to your little ones. I will share ideas, links to free downloads, books and videos that you can use with your students or children at home. This post is really your one stop shop for the theme, human body!
Human body is quite complicated and can be a tough theme to introduce to young children but its not impossible. I broke the whole theme into parts and that made it easier for my little one to comprehend most of it.
The grid below shows our entire plan for the month and the various activities that we did. I will break up all these activities so that you get a better understanding of each one of them.

WEEK 1
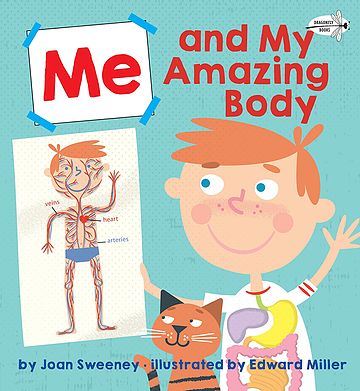
We started with reading this awesome book called "Me and My Amazing Body", and followed up by making our body and sharing why it is amazing.


The printable we used is available for a free download at the bottom of the post.


The next day, I let the little one explore some x-rays. We discussed what they are and why are they used by doctors. I read the book 'The Skeleton Inside You' and introduced her to the human skeleton.

We build a paper skeleton and named the bones like skull, rib cage and pelvis. The printable for the paper skeleton can be downloaded from here: https://www.thepurplepumpkinblog.co.uk/build-a-skeleton-free-printable-instructions-crafty-october/

We talked about the importance of bones and learnt that they give our body shape. We made a person with play dough and tried to make it stand but it kept falling. Then we added straws (pretend bones) for legs and hands and made the play dough person stand up. With this experiment , the little one understood that our bones give us shape. If we didn't have them , we would be floppy like the play dough person without straws.

We also made a skeleton with q-tips and recapitulated the names of all the bones.
After the bones, we moved on to muscles and talked how they pull on our bones to make them move. We can jump, run and skip because of our muscles.
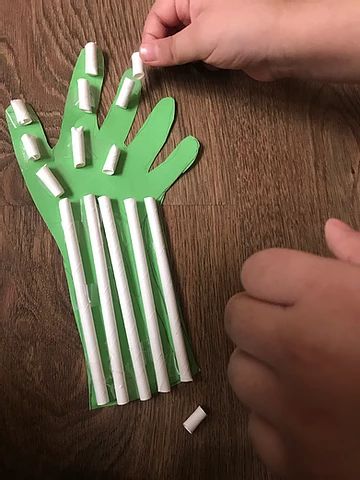
We made a hand model, added bones and muscles to see how they help us to move.
u would need the following things to create this model:
Thick paper
String or yarn
Straws
Tape
Scissors
Pencil
Outline your child's hand on the card stock and cut it out. Cut the straw into three segments for each finger. Tape them down without covering the ends. Tape the yarn to the back of the hand and then thread it through each finger segment down to the wrist. Now, you can move the yarn to see how the hand moves!


WEEK 2
After the week long discussion about the skeletal system, we moved on to learn about the internal organs. We read the book, "Me and My Amazing Body" again and named all the body organs. Then we traced our body and tried to place all the internal organs in the right place.
You can download the pictures of the internal organs from here:

The next day, we named and labelled the organs on a printable, that you can find for free at the bottom of the post.

The study of the brain came next on our list. It was absolutely delightful to teach about it and to my surprise the little one picked up all new vocabulary words related to the brain. We used play dough to make the model of the brain and talked about three main parts of the brain- cerebrum, cerebellum and the brain stem. If you have a little older preschooler, you can try talking about the frontal lobe, occipital lobe, temporal lobe and the parietal lobe too. We also discussed how each part helps us . We kept it simple and talked only about one or two functions of each part. The brain stem helps us to breathe, and swallow food. The cerebellum helps us to balance and coordinate. The cerebrum helps us to see, hear, write and learn.
We used the printable from here: https://filefolderfun.com/SearchAge

Then we did a brain experiment. We talked about how the brain sits inside the skull and how it floats in cerebrospinal fluid. To show what would happen if this fluid wasn’t there, we did an experiment with eggs.
You would need:
Two containers to represent the skull
2 eggs to represent the brain
water to represent cerebrospinal fluid
Put one egg in a clear container. Let your child shake the container as hard as they can. Explain that this egg has no fluid to float in. What happened to the egg? It broke.
Take the other container and add the other egg and enough water so that the egg is covered.
Now let your little one shake the container. The egg should remain intact. Discuss why this happened? The cerebrospinal fluid protects the brain and doesn't let any damage come to it if you fall down and hurt yourself.

We read the book "Your Fantastic Elastic Brain" by Joann Deak. It was a great read but some parts can be complicated for the little ones. So you would have to modify the content a bit.

WEEK 3
The next thing on our theme was the circulatory system. It was super fun to learn about it as it involved sensory play. We read the book, "Hear Your Heart" by Paul Showers to get a basic understanding of what the heart does and why it is a very important organ.

We created a heart model to see how it pumps blood. Your child will need your help to create this model. He/she can mix colour in the water but I would advise that you do the cutting and poking in the balloon as it involves the use of sharp objects.
To create this you will need:
A small glass
2 Bendy Straws
Balloon
Tape
Water
Red Food Coloring
Fill your glass halfway with water and add some red food coloring to represent blood. Take the balloon, cut the neck part off and save it. Take the top part and put it over the top of the glass so it is taut.
Poke two holes in the top of the balloon, keeping a gap of an inch.
Push the straws through each hole with the bendy part sticking out the top.
Take the neck of the balloon that you set aside and use it to cover the opening of one straw sticking out of the glass with tape.
Your heart is ready to pump the blood! Have your child push up and down on the balloon and see the blood being pumped out.

Next day, we talked about the blood cells and what is blood made up of.
Creating a blood sensory bin was a perfect idea as that really simplified the learning.
We added some read water beads (red blood cells), cotton balls (white blood cells) and yellow pom poms (platelets) and at first I let the little one simply explore the bin to feel the different textures. Once she played enough , we named each part and talked about the functions. The red blood cells carry oxygen, platelets help our blood to clot and white blood cells fight infection. We also talked about the plasma but I didn't go too much in detail. We also sorted each into different plates after we finished playing.

We also did a free hand drawing of the blood cell.

We did an experiment to find our heart rate. Use the printable below to record your child's heart rate. It is available for free at the bottom of the blog post.
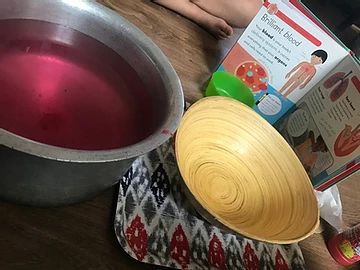
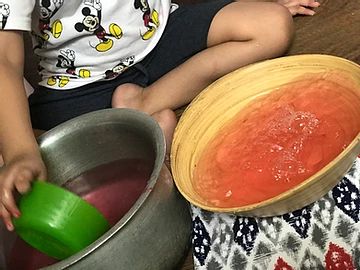
We wrapped up the learning about the circulatory system with another fun experiment. I wanted to explain to the little one how much blood the heart pumps in one minute, so I added 5 litres of red coloured water in a bowl and asked the little one to transfer all the water in one minute into the empty bowl. It was absolutely exciting for her to try this and she figured out that the heart does pump a lot of blood in one go.


WEEK 4
This was our last week of study about the human body. We discussed the respiratory and the digestive system.
We made a lung model, using two straws and two plastic bags which we stuck with tape. We added a nose and lips too.

The little one had fun blowing through the straws to expand the lungs. I did share with her that the air we breathe in is called oxygen and what we breathe out is called carbon dioxide.
We also saw a video to understand how our lungs work.

To learn about the digestive system, we read the book, "My Top To Bottom Body".
We named the different parts and talked about their functions. And then we turned it into a hands on activity to understand it in a more deeper way.
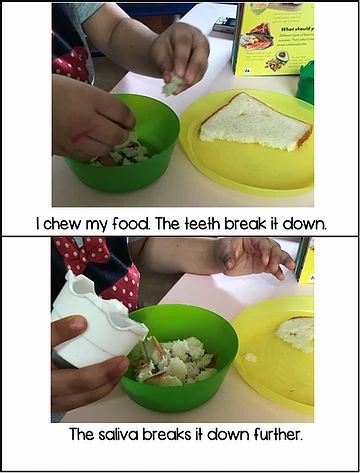
Step 1: I gave my little one some bread and she broke it into pieces. We discussed that our teeth does the same thing. Then she added some water(saliva) to help the food go down the food pipe.
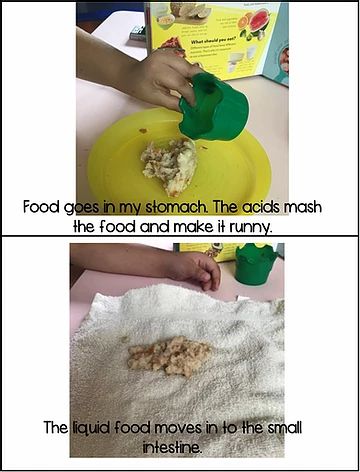
Step 2: Then we transferred the mashed food into a plate (stomach). We added some vinegar (acids) to make it runny. Then the liquid food moves into the small intestine (towel)
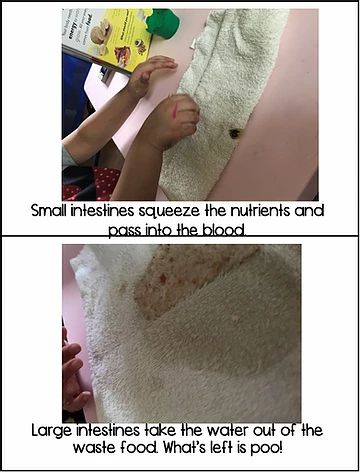
Step 3: Small intestine squeezes the nutrients and pass it in blood.
Step 4: Large intestine takes the water out of the waste food. What is left, is poop!


The next day we measured the small and the large intestines. I cut paper that was 20 feet long (small intestine) and paper that was 5 feet long (large intestine). Then I placed number cards from one to 20. The little one rolled the paper intestines and discovered how big are small and large intestines are.


We finished the whole unit by doing another sensory bin. I added plastic internal organs in the red water beads and gave my little one a printable so she could name, label and match. It was a great way to recapitulate everything.
And finally that's the end of the blog post! Phew!
But hope you enjoyed reading about all these activities and will surely try them out with your little ones or your students. This post has a month long repository of resources and everything you need to kick start this fabulous science unit. Children will be eager and excited to learn all the activities and you will surely get a feeling of accomplishment after it ends.
And your set of free printables can be downloaded by clicking the photo!

Comments